Dovetailing Long Boards
When I was developing the Collinear Marking method of marking out dovetails I knew that there was going to be an inherent advantage in many situations. One of these is dovetail joinery for longer and larger boards. My most recent project that fell into this category proved it to me.
I did a bunch of searching for ways to solve the issues of long-board joinery and kept finding just timber-frame and hardware solutions. I knew collinear marking was the answer and the proof positive was my result.
In my last post, I promised a step by step look at the entire process. For this post, part one of three, I’ll go over my process for marking out dovetails on long workpieces. I apply this process to smaller projects as well but it’s kind of fun to be able to dovetail boards I could not with the traditional transfer methods (because of the ceiling height in my shop).
In the companion video below, you can watch as I go through the process:
In the up-coming Episode Two, I will show how simple it is to mark out both boards for a set of dovetails BEFORE ever picking up a saw.
In Episode Three, I will show the cutting and fitting of the joint. I’m STILL impressed every time, and people still tell me it’s not possible, even after they see it done.
Collinear Dovetail Layout
My process starts as it always has to, milling the boards to size and making sure they are flat, square, and true. Once they are, I’ll shoot the ends with a plane to get them ready for layout. I start by arranging the 2 boards as a corner as they will be assembled and decide which board will carry tails and which pins. Usually the stresses anticipated for the assembled project will make the decision for me. For instance, the fronts and backs of drawers will carry the pins to take maximum advantage of the way dovetails lock together physically. For a case piece I’ll decide based on what will be seen most when you look at it and how loud or quiet I want the joinery to be. Featuring the ends of the tailboard gives quieter straight lines and the ends of the pinboard screams “DOVETAIL!!”.
With the parts arranged I number the corner and mark the outside faces. This helps me keep the parts straight throughout the process. Now I’ll start thinking about layout: How many pins? How many tails? Do I need to allow for a top or bottom? Generally, I’ll use offcuts of the same stock and some masking tape to experiment until I’m happy with the look. I’ll even shade the taped test part to previsualize the finished product. I find it very effective. With the tough decisions made I clamp the boards together with the outside faces in the center of the 2-board sandwich and they are ready for layout.
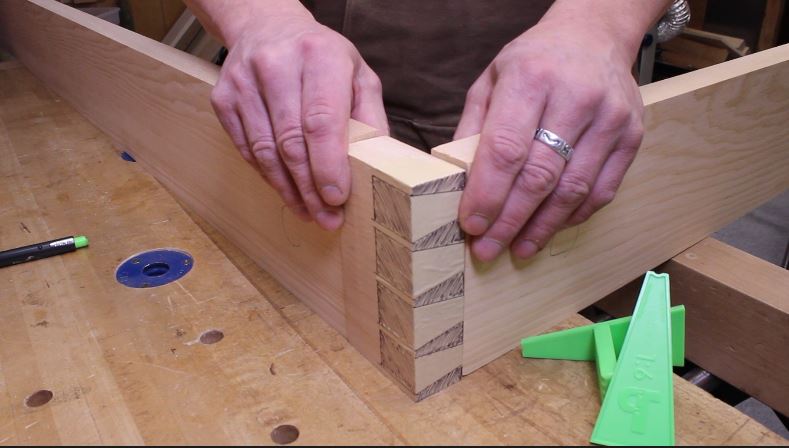
Since I chose a 5-pin layout (2 half and 3 full pins) I start by marking for the center pin. I do this up away from the outside faces. After I mark for the half-pins, finding center again finds the last 2 pins. You can lay out your pattern any way you like; measure twice, walk it off with dividers, or even just eyeball it. Make your preliminary marks away from the center of the sandwich. All of my lines are marked with a .7mm mechanical pencil because Tailspin Tools are calibrated specifically to that size.
With my layout fixed I carry the marks down across the center of the outside faces In the video you’ll see me use 2 Starrett double squares to mark the position of my half and full pins.
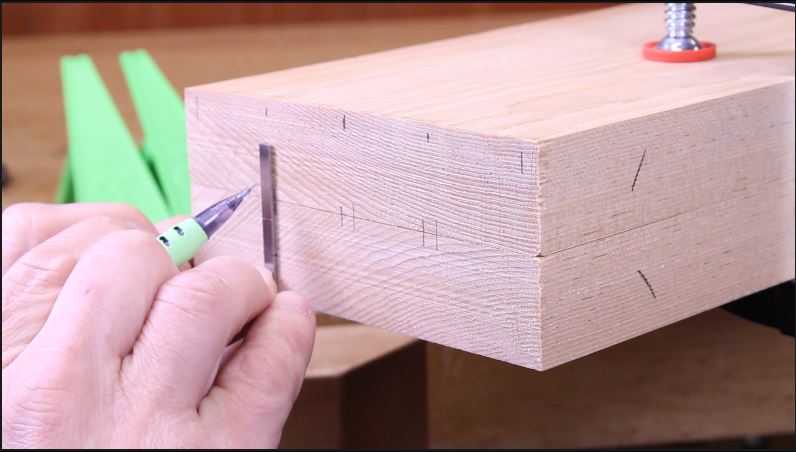
I use these tools because I think they complement each other size-wise. I just eyeball the center marks on the full pins and mark both sides of the square. It’s quick and accurate. The important thing is that you use a square to carry your marks across the center line of the outside faces and make crisp marks with a .7mm mechanical pencil. These are the starting point for collinear marking. You now have matching layout marks on the outside faces of both boards.
In Episode Two, we’ll use Tailspin tools to layout our full set of dovetails…both tail AND pin boards. In Episode Three, we’ll cut and fit the joint, all without ever balancing one board to mark the other.
- 2026’s Best Dovetail Marking Tool - November 12, 2025
- From Boxes to Cases: Real‑World Benefits of Collinear Marking & How to Use It - November 7, 2025
- Inside the Innovation: How Calibrated Collinear Marking Works - November 5, 2025