
Introduction
A true mark of a skilled woodworker is making beautiful furniture using dovetail joints. Fine furniture is often constructed with small dovetail drawer boxes. The dovetail drawer is extremely durable but also aesthetically pleasing and strong in design.
This section shows you how I built a Dovetail Drawer Box commissioned for a very special purpose. This project was a perfect opportunity for me to demonstrate my way of creating beautiful dovetail drawer boxes.
The Project
I have a commission for a funerary urn that can accommodate two occupants. An unusual project certainly, but very important for me; it was my Parents that made the request.
They asked if I’d do it about 10 years ago, of course I said yes. A walk through their home would prove I don’t often say no. Normally when I ask for the particulars like size, height, wood species (light or dark mainly) I get a fast reply. Not this time.
Dovetail Drawer Box Urn Sizing
Fast-forward 10 years and I have received the interior dimensions of above-ground drawer box size of an in-the-wall Eternal Storage Locker. I have to start the project, but I will say right now that it will remain incomplete indefinitely.
I’ve learned some odd facts recently. After cremation, all that is left are the ‘solids”… bones & teeth, which are run through A “cremulator” to reduce them to the granular substance we call ashes. If you’re curious, and I caution you, there’s a detailed Youtube video about the whole process you can search for. Let me switch your brain back to the topic of making dovetail drawers!
Next, the allowance for volume inside of a drawer box is about one cubic inch per pound of human and the average available urn holds 200 CI. You can’t un-see this stuff.
Prototyping A Box For My Parents
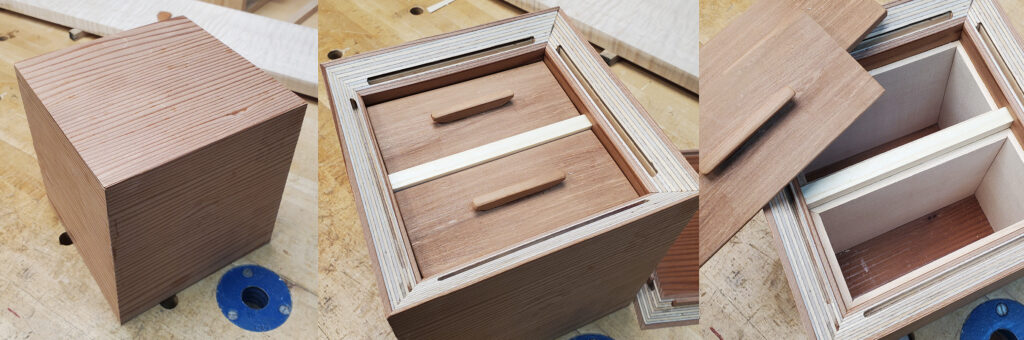
I decided to make a scaled prototype dovetail drawer box, as I do with most projects I care about, before diving in. I’ve been experimenting with “waterfall cube” construction, trying to nail down clean mitered box corners all the way around a box and the whole “cubic inch” thing sealed it. The urn would be a cube.
So I built the cube-o-type drawer box and sent a photo to my parents in Florida. Oddly enough they really didn’t care!
I suppose from their perspective it makes sense, but I was surprised because for me it’s a special thing and raising questions I had not addressed in depth until I started the build.
Oh well. And the point of this is?
Dovetail Drawer Layout and Materials
Now I had a small cube, veneered in old-growth redwood (it was lying around from a ukulele build) that I had no use for. I was thinking fireplace when a friend said I should turn the lids into drawer fronts. OK, small dovetail drawers are something I haven’t done for a long time; why not?
I had a block of zebrawood in the offcuts bin. It was wide enough to make the drawer box sides but not wide enough to straighten out the grain. I decided to go with it anyway.
Marking Challenges
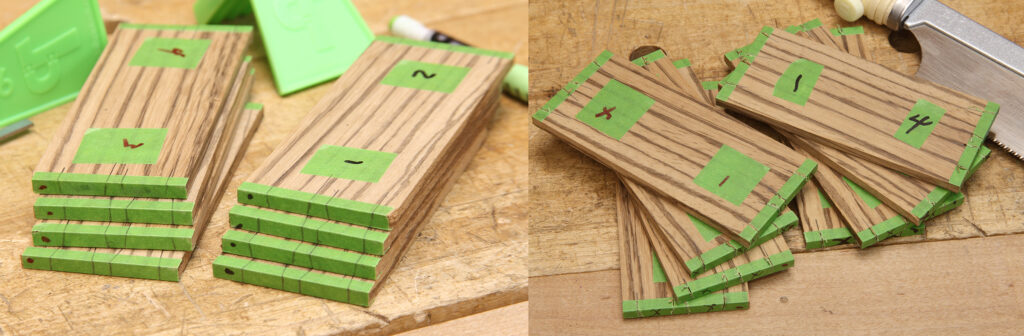
The issue I came upon quickly was that light & dark pencils, as well as dovetail marking gauge scribe lines, vanished into the zebrawood. My eyes are almost 60 (the rest of me is MUCH younger) and even a task light and cheaters were not doing the job. Tape time!
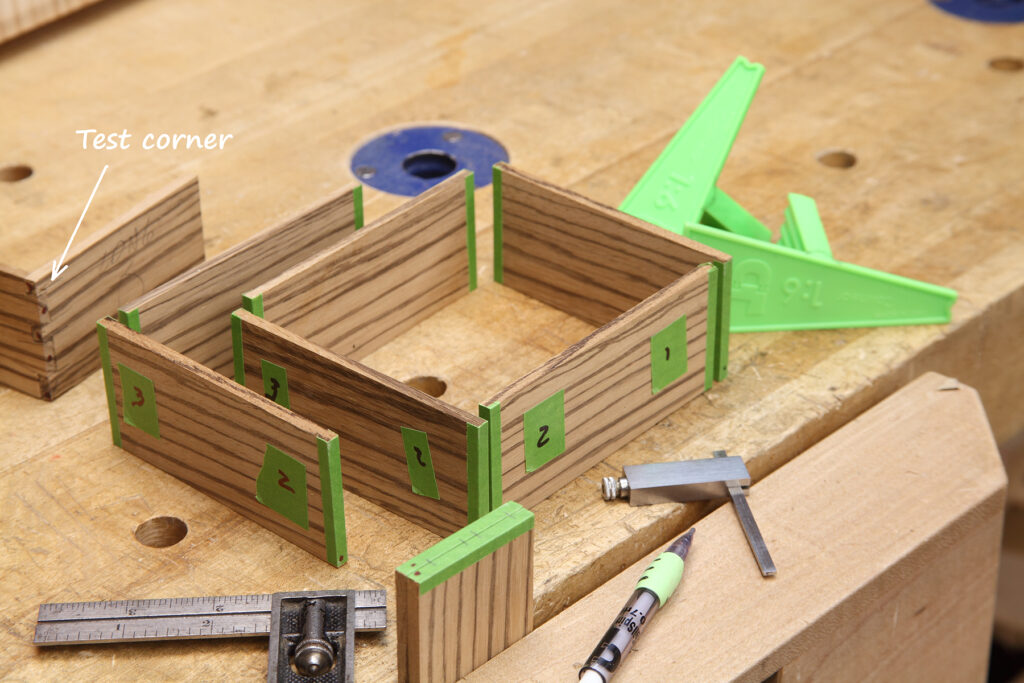
I numbered my parts, split some Frogtape, and covered the ends nice and tight. My Veritas wheel gauge slit the tape at the baseline giving me the easy-on-the-eyes target I needed.
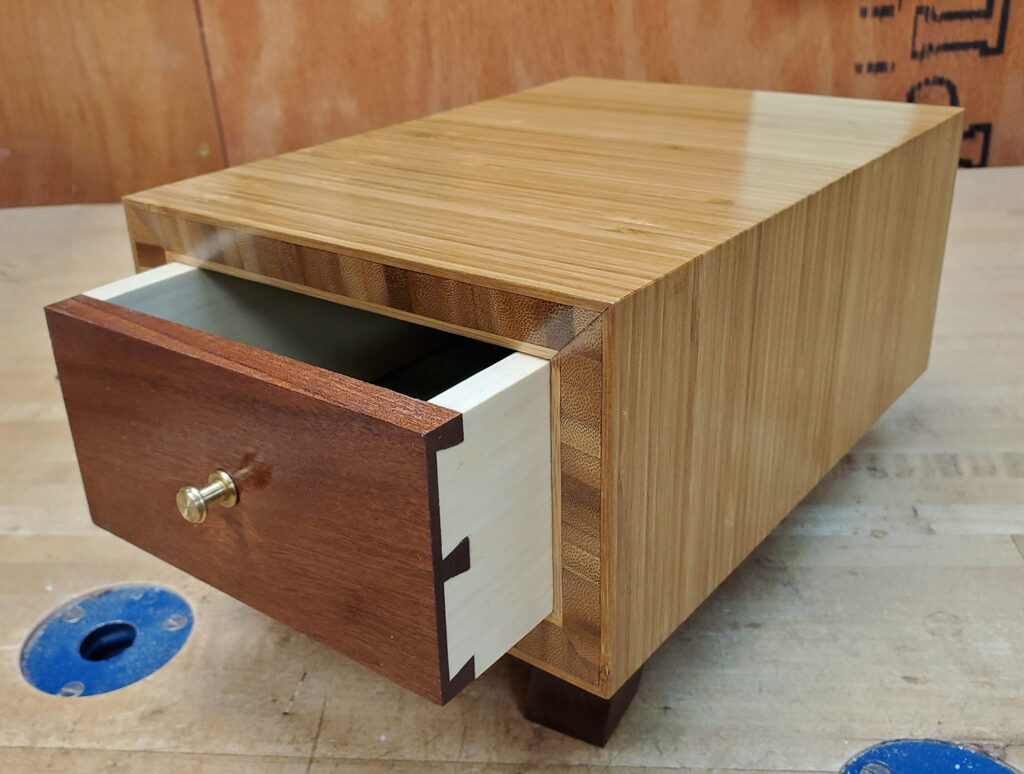
Half of my parts got red sharpie and half got black. I laid out the dovetails like I always do. This time I used an extra-wide half pin at the base of each to give me a nice clean space to insert the captured cherry (more from the scrap bin) drawer box bottoms. I marked the bottom corners with a sharpie dot to stupid-proof it.
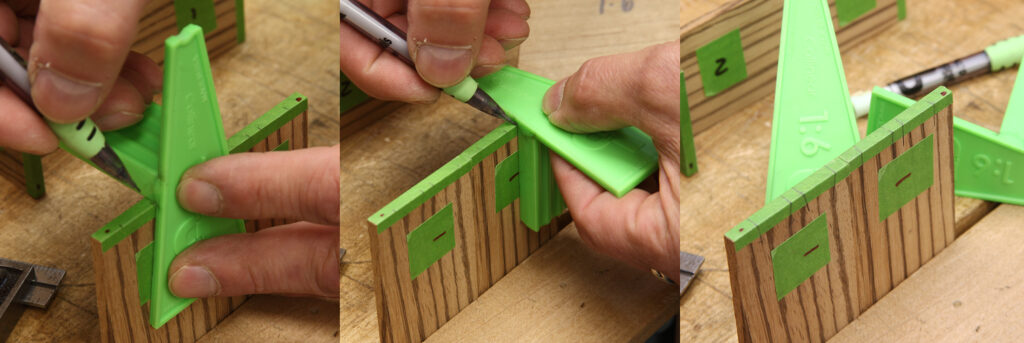
Dovetail Pins and Tails Process
On to marking out, I put the face of each joint together and established my collinear marks with a .07mm pencil, then opened each sandwich and marked out my small dovetails using the 1:6 Tailspin Tools marking set. In short order, all of my pins AND all of my tails were marked out. I tagged the waste and went to get my saw.
Easy Transfer
I cut every line in a single session. All the pins and all the tails. The last time I made small drawers like this was in the days before Tailspin Tools and collinear marking. I remember it being a nightmare working the transfer on such small and thin parts, working inside such tiny spaces. Not today! No transfer, none, nada.
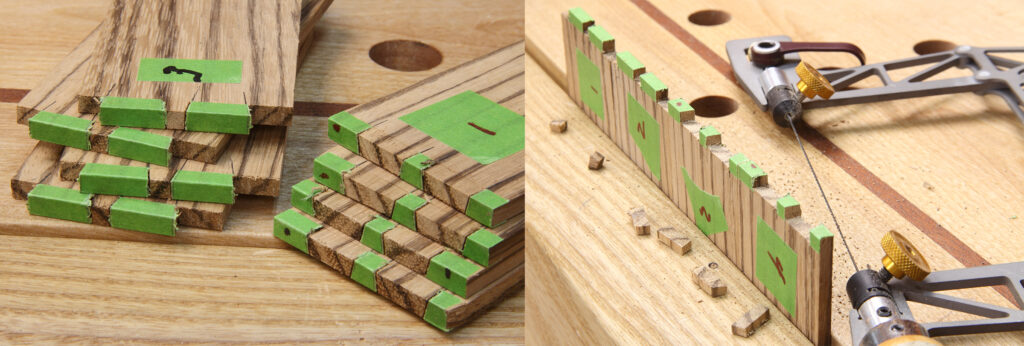
After I cut away the shoulders for the dovetail drawers’ half-pins, I peeled the tape off the waste and used a fretsaw to remove the bulk of the itty-bitty waste, peeled the tape, and moved to the chisels.
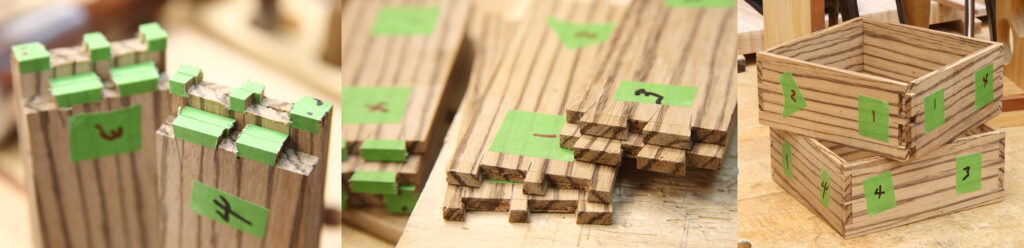
I did all of the pinboards first, then all of the tailboards. After the chopping was over, I introduced the parts to their mates, test fitting each box corner. All but two slid together nicely; those two needed about 5 minutes each to find the bind and make the adjustments. I had some small gaps, but I almost always do.
I removed a line or two with the saw I guess. Normally I can predict the binds based on my pencil marks, a missing or too-fat leftover line is where I look first. In this case, the lines were peeled with the tape.
Initial Finishing
I split some more tape and covered the inside joinery so I could pre-finish the drawer interiors. I went with three coats of dewaxed shellac for the sides and a coat of green milkpaint for the bottoms.
I sanded the paint back with 220 grit to let some of the browns of the cherry come through then glued up the drawers.
I used liquid hide glue because it would dry down to the point of invisibility under shellac on the zebrawood.
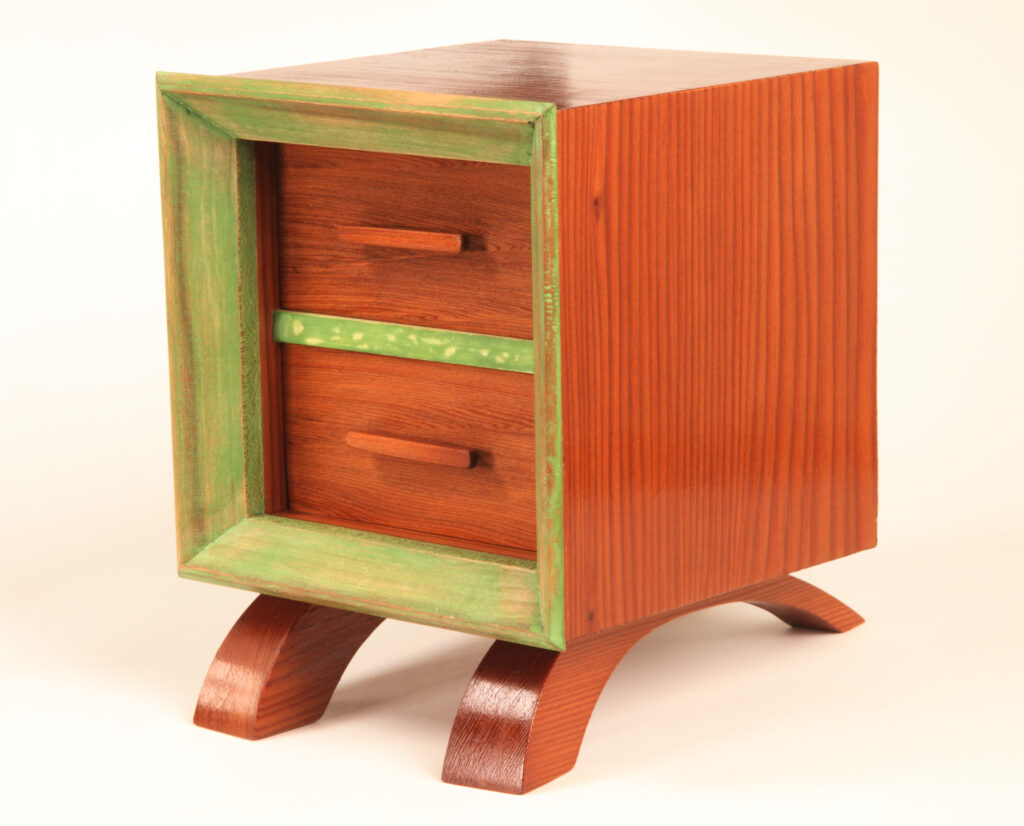
Box Details
I had to hide the spline grooves that were meant to seal the cube for eternity. I came up with a simple picture frame concept that would be flush on the inside and just a bit proud & wide on the outside. Did I say simple?
I milled up some material roughly 1” wide x ¼” thick. I cut some miters in some offcuts to try a test fit and realized I was trying to line a box with crown molding; not so simple. Using an online tool I found that I had to cut my parts to a bevel angle of 30 degrees and a miter angle of 35.3 degrees. It would not have been my first guess, but it worked!
I dropped some plastic wrap over the mitered box opening, so I could use it as a base to hold the frame parts together and more Frogtape to clamp the glue-up.
Final Finishing
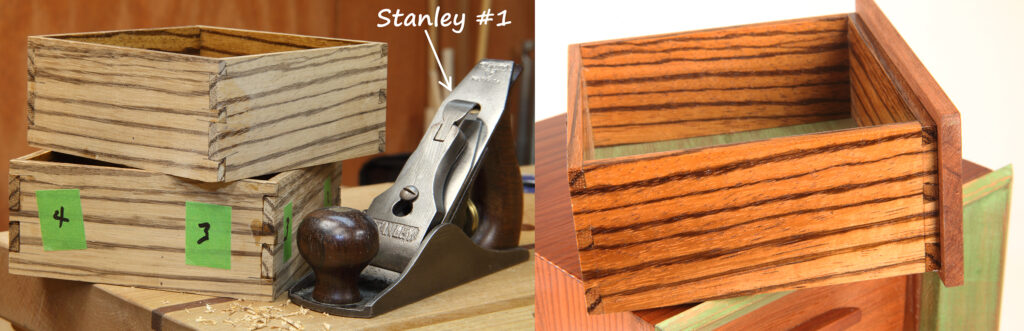
I painted and sanded the frame, then glued it onto the box. While the glue dried I cut some legs from a redwood scrap and prefinished them. They are screwed to the box at a raking angle from front to back. The dovetail drawer box has 53 parts.

I’m pleased with the finished product and very happy with the Tailspin Tools workflow for tiny dovetails. I have no idea what to do with the box, I suppose it will leave here as a gift. The only ones I can’t give it to are my Parents!
- 2026’s Best Dovetail Marking Tool - November 12, 2025
- From Boxes to Cases: Real‑World Benefits of Collinear Marking & How to Use It - November 7, 2025
- Inside the Innovation: How Calibrated Collinear Marking Works - November 5, 2025